

一、修改nginx.conf或vhosts.conf文件
1、修改nginx.conf配置文件
找到phpStudy的安装目录,找到nginx.conf文件,如我的文件路径为:D:\PhpStudy\PHPTutorial\nginx\conf\nginx.conf,添加以下代码到nginx.conf文件中:
server {
        listen       80;
        #填写你所配置的虚拟域名
        server_name  blog57.test;
        #填写网站所在目录 eg:"E:/phpStudy/WWW/wordpress"
        root  "D:\PhpStudy\PHPTutorial\WWW\blog57\public";
        location / {
            index  index.html index.htm index.php;
            autoindex  on;
            # 伪静态配置
            if (!-e $request_filename) {
                rewrite  ^(.*)$  /index.php?s=$1  last;
                break;
            }
        }
        location ~ \.php(.*)$ {
            fastcgi_pass   127.0.0.1:9000;
            fastcgi_index  index.php;
            fastcgi_split_path_info  ^((?U).+\.php)(.+)$;
            fastcgi_param  SCRIPT_FILENAME  $document_root$fastcgi_script_name;
            fastcgi_param  PATH_INFO  $fastcgi_path_info;
            fastcgi_param  PATH_TRANSLATED  $document_root$fastcgi_path_info;
            include        fastcgi_params;
            fastcgi_param TP_ENV  sixian;
        }
}
更改“server_name”和“root”后面的值为自己实际配置的虚拟域名、网站所在目录
2、修改vhosts.conf配置文件
①修改vhosts.conf文件
vhosts.conf文件在nginx.conf文件同一目录下,复制以上代码到vhosts.conf文件中,更改“server_name”和“root”后面的值为自己实际配置的虚拟域名、网站所在目录
②nginx.conf文件中引用vhosts.conf文件
更改vhosts.conf文件后,别忘记在nginx.conf文件中引用vhosts.conf文件,nginx.conf文件中需有如下代码:
include vhosts.conf;
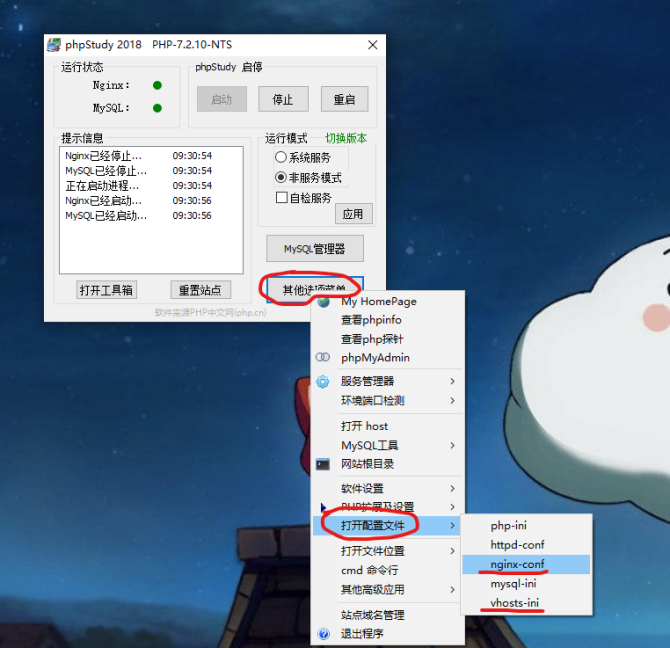
以上1、2方法任选其一即可,另外,除了进入phpStudy的安装目录打开配置文件外,还可以直接在phpStudy版面打开,如图:
二、修改hosts文件
以上配置完毕后再配置本地域名解析:
找到C:\Windows\System32\drivers\etc 下的hosts文件,添加本地虚拟域名:
127.0.0.1 blog57.test
三、重启PHPstudy(重启Nginx服务器)
修改配置文件和本地hosts文件之后,需重启PHPstudy。
完成以上三步之后,在浏览器中输入所配置的虚拟域名,即可访问本地网站